Friday, 22 July 2016

What, Me Crafty? Again! (Glow worm caves)

This past Christmas, my husband's sister got the kids a subscription to Little Passports. If you've never heard of this, it's amazing. Once a month, the kids get a package containing a letter from the three characters traveling the world, a post card, activities, stickers and a special present all relating to a theme.
The "monuments" month came with miniatures for four famous landmarks (the Leaning Tower of Pisa, the Taj Mahal, the Great Wall, aaaaaaand..... The Statue of Liberty, I think) and the "food" month came with this really nice solid wood fishing game. This month was "natural wonders" and it came with a big chunk of pyrite (Fool's Gold) which the kids are now obsessed with. 

These aren't the worms. These are sticky strings of saliva they use to catch food. But how beautiful are they?
The point of my story is that in the activity book there is often a craft. Which we don't do because mummy isn't much of a craftypants. Usually. Today, however, was a different story. The craft was inspired by the Glowworm Caves in Waitomo, NZ, which are amazingly cool. If you haven't heard of them, watch BBC's Planet Earth. Ah-mazing. And the end result of the project was also amazing! How was that for a segue? 
I did tweak the instructions a little, mostly by adding glitter and trying to make it look more like the actual glow-worm chains in the cave. And really, no project is ever made worse by the addition of glitter! 
This isn't the glow worms, either. It's the end result of this craft! How awesome!
Materials:
Glass jar with a lid
Yarn or string
Glitter paint
Glow-in-the-dark paint (in a squeeze bottle works best)
Paint brush
Glue or tape

1. Cut the yarn into various lengths, dependent on the size of your jar. 
2. Paint the pieces of yarn with glitter paint, leaving about 1cm unpainted at one end.


3. Once the glitter paint is dry, add dots of glow-in-the-dark paint down the length, leaving about 5mm between dots. Let dry completely.


4. Glue or tape the unpainted ends of the yarn to the inside of the jar lid. I covered the inside of the lid with double-sided tape so the kids could stick their bits of yarn on without getting themselves stuck or making a huge mess.


5. Screw the lid on the jar, making sure to keep all the yarn inside.


6. Charge it up in a light and then watch them glow!

The kids are so in love with these things!

Sunday, 29 May 2016

A Taste of Childhood (Oatmeal Sandwich Cookies)

I am half-Icelandic. I am very proud of this fact, but other than a fascination with ancient Norse clothing and culture and a physique that leaves me looking like I just walked off the set of Vikings, it hasn't had a huge impact on my life. Unless, of course, we talk about Christmas.


The holidays are a time when my Scandinavian background comes to the fore. We open presents Christmas Eve. We always get clothing so the Jólakötturinn won't eat us (that's a demon cat that comes for people who don't get new clothes by Christmas Eve. It's a real thing. Honest). And we eat a few traditional foods. Not Lutefisk. Or blood sausage, though my uncle did make some one year for my Amma (that's my Grandmother). No, we eat things like Terta, which is possibly the best thing in the world. It's a layer cake, with thin layers of cookie separated by layers of cardamom-spiced stewed prunes. I know, it doesn't sound amazing, but believe me it is. I once wrote a poem about Terta. That's how good it is.


Oats. The beginning of so many amazing things. And porridge.
But I'm not going to write about Terta today! That's for another day, perhaps closer to Christmas. No, today I am writing about it's little adopted cousin. These are not an Icelandic food, but they could be. My mum made them up when I was little and we have always called them Terta Cookies.

Best. Cookies. Ever

Basically, they are an oatmeal sandwich cookie with Terta filling inside. It's very simple, but these are my most favourite cookie in the world.
The oatmeal cookies are from a Robin Hood Flour cookbook my mum has had forever. I'm honestly not sure she ever makes anything but these out of it, I don't think I've ever seen her do so. (No, wait, I tell a lie. I just had to go get one of these cookies to eat while I write this and on the way back from the kitchen I remembered a recipe for Oat Bars - also to die for - that came from that book)
I realized while making these that they would be quite easy to make vegan. There are no eggs, the milk is easily replaced with non-dairy milk and I used coconut oil instead of some of the butter and shortening when I made this batch with zero ill effects. Yay vegan recipes! (note: if you live in a climate where your coconut oil is normally a liquid, chill it thoroughly before using it in this recipe and try to make the dough up quickly so it doesn't melt)

Half coconut oil, half butter. All delicious.

I will say this, though: don't try to make it healthy by changing the sugar. The brown sugar is a huge part of the flavour and texture of this cookie. If you were to change it out, they would never be as good.

Now I have the Rolling Stones stuck in my head. Yes, I know that song isn't about baking.

Once you mix up the dough, you chill it. The recipe says "several hours," I accidentally left mine more than 24 and it was fine. DO NOT skip this step. This dough is very very sticky; if you tried to do this at room-temperature it would be a disaster. Even well-chilled, you need a lot of flour to roll them out.

Seriously. I could eat my computer right now.

Rolling out the dough was difficult for me. Not so much the rolling itself, but resisting the urge to just eat it all raw was really hard. This cookie dough straight-up smells like my childhood. I ate way more of it than I'm really comfortable admitting (or even thinking about...).

Aren't they pretty?

Once the cookies are baked and cooled, make sandwiches! I, of course, fill mine with Terta filling (I'll link to that post when I do it next year, promise) but I imagine you could fill it with anything you want, really. Or just eat them plain. This is a spectacular oatmeal cookie, it really is.


Mmmmm... prunes....

Rolled Oat Cookies - makes about 60 2" cookies, or 30 sandwiches
(adapted from Robin Hood Flour cookbook ca. 1975)

1 1/2  cups flour
3 tsp baking powder
1/2 tsp salt
1 cup Butter/shortening combination (or coconut oil)
1 cup packed brown sugar
1/2 milk (or non-dairy substitute)
2 cups rolled oats

Measure flour into dry measuring cup, add baking powder and salt. Stir well to blend
Cream shortening, butter (or coconut oil) and sugar thoroughly. Add milk gradually, mixing well.
Add flour mixture to creamed mixture and mix well.
Stir in oats.
Chill dough several hours until firm.
Preheat oven to 350F.
Roll out dough on floured surface to 1/8" thickness. cut with floured 2" cookie cutter. Place on lightly greased (or lined with parchment paper) baking sheet.
Bake 16-18 minutes, until golden. Cool on racks.


Tuesday, 19 April 2016

Just This Side of Sanity, For Now...


There is a sign at my local Fabricland that says "Dear Fabric Store Worker, please stop asking me what I'm going to use this for, I'm running out of ways to say 'It's going into my stash.'" I try very much not to be that person. I am sometimes, I freely admit that; anyone who sews is occasionally going to be. However, I have to keep it under tight control. First it's a bit of fleece bought on sale in the spring, squirrelled away for the next fall. Then it might be a piece of silk twill in an odd colour that I'm sure I'll do something with someday. (I haven't bought this one yet. It stares at me every time I'm at the store, though...) But that way lies a work room that no one but me can walk through and perhaps a brief moment of fame, guest-starring on a future episode of Hoarders.

So I've gotten pretty good at the old self-denial. I don't usually let myself buy aimless fabric; that is, fabric I have no immediate purpose for. There are times when I've bought something for a purpose and then realize I have absolutely no time to work on it. And there are the times when someone (or someone's family member) wants/needs to get rid of some of their stash, and I end up with a whole bunch of fabric I have NO idea what to do with, but it's often too cool or pretty to get rid of. As such, I do have a stash, of course. It's very helpful when I'm working on shows and realize that a piece of fabric I already own is just perfect for someone. It's less helpful when I have to clean up my work room/our guest bedroom because we have guests coming to stay.
The placement of this buttonhole makes me giggle. Possibly more than it should.
However, there are times when I simply must buy a piece of fabric, when it's just so amazing or beautiful or unique and I love it so much I could happily stretch it over a frame and hang it on the wall. I had one of those moments the other day. I'd been eyeing this fabric for a while now, and it was on sale! The most on sale it would likely ever go, too. I went for it. I knew if I didn't, the next time I came by it would be gone and I'd be sad. I don't like making myself sad, so instead I made myself very happy! I mean, come on, look at it! Disney villains in messy makeup on a grey/pink print with spiders? Impossible to look it in the face and say no.

Now, what to do with it? I knew if I put it in my stash it would take years before I got back to it, so I needed to do something ASAP. I have less impulse control when it comes to pattern sales, so I have a somewhat largish collection of untouched patterns. I went through them and found one by Butterick (B6318) for an early 60s dress and decided to give it a try. It turned out super cute, but not for me. It has a really high boat neck, which doesn't flatter me and drives me crazy. Okay, take two.

Love the skirt, but... Seam ripper time!

I have been holding onto a Vogue shirt-dress pattern for years (V8352). I honestly don't think they sell it any more. (note - I just checked the Vogue website and they do not. They actually sell almost the exact same pattern, but it buttons in the back now. Huh.) I've held off on it partly due to previous negative experiences with Vogue (they have a tendency to have mistakes or very confusing directions), but I have to say this one was great. It came together pretty quickly and, like all Vogue patterns, it has some very nice little high-end touches, like the snap at the waistline to keep it from gaping. Plus, it fits beautifully! I didn't have to do any alterations and I really like the fit, especially in the back.
Fancy snap!

And these buttons! How perfect are they?

Tangled vines! Love it!
My husband likes it, but he thinks it should be tighter. Granted, he says that about most of my clothes... :)

I'm so happy I bought this fabric, I'm so happy I took the first dress apart, and I'm so very happy with the final product! Today is a day to celebrate aimless fabric.

But only today, because again, that way lies madness.
I LOVE the back of this dress!

Tuesday, 22 March 2016

What, Me Crafty?

Last week, Rowan's teacher sent home a request for hard-boiled eggs. They were to be sent with him today as the class wanted to dye Easter Eggs. He was very excited about this, and naturally Willow wanted in on the excitement. To her dismay, we once again reminded her that she doesn't go to school yet. Sadness ensued.... Then I had a brilliant idea: why don't I boil extra eggs and then she and I can dye some ourselves? We could do a CRAFT! (Here's the thing. Many people consider me very crafty. I am not one of them. I make things, yes, but I've never thought of myself as crafty. There's a distinction there, it's in my head, but don't ask me to explain it coherently. Anyway, I haven't dyed or decorated eggs since elementary school, so this is kind of a big deal.)

I think I did okay, too.

I love to eat hard-boiled eggs, so decorating them always seemed an unnecessary step between the egg and my stomach. Then last year, while on a playdate, the kids got to decorate eggs and they wouldn't let me eat them. Naturally, the rules are different this year. If I'm going to be crafty, I'm going to get a snack out of it. So there.

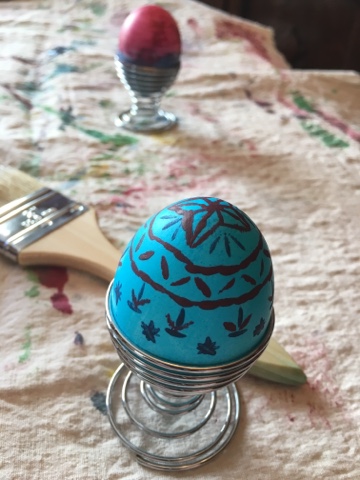
Pretty blue!

I made up a dye bath, a very basic food colouring one: 1 cup boiling water, 1tbsp vinegar, 20+ drops food colouring. I'm very excited to know this recipe. (Apparently if you mix 1tbsp of olive oil in with the bath you can do tie-dye eggs. I haven't tried this, but now I really want to.) 

It looks like a Doctor Who prop...

My plan was for us to just plain-old dye the eggs, maybe try a two-tone dip-dye, but Willow had another idea.
Last October, the ever-wonderful Mista at AppleBox Boutique sent the kids two sample pots of Chalk Paint to paint pumpkins. I'm sad to say that that didn't happen, because I was way too busy. How busy? Let's say I lost 10 lbs. that month simply due to not having time to eat. It was a tough month. However, Willow never forgot about the "special paint" Mista had sent her, so when I started getting things set up to dye the eggs, she immediately went to the shelf and got the paint pots and her paintbrushes down. She was going to paint her egg, no arguments allowed.

Hair! 

It worked beautifully! She put the paint on pretty heavy, so we let it dry for a while and then wiped the excess off, coincidentally leaving behind a neat texture (Willow laughed and laughed, "It's an egg with hair!!!").
And now for the pink

Lots and lots of pink...

I still wanted to try the dye bath, so my egg became blue. I quite like the colour, but totally plain isn't really my style, so I added some designs with the Chalk Paint. I'm super happy with it. I would have continued the designs over the whole egg, but the bottom cracked when I was putting it (read: dropping it by accident) into the dye bath. I have faith that the food colouring will be safe to eat, but I'd rather not chance eating straight paint... Next time!

Pink and blue!


There will definitely be a next time. The kids and I are going on a road trip this weekend and hard-boiled eggs are a favourite road snack of mine. This trip, they will be Fancy!


Saturday, 23 January 2016

Bottling summer (lilac/pear mead)

In the last couple of years I have discovered a serious love of brewing. I started with a few wine kits (two malbecs and a Syrah) but then I started looking for more information. I didn't just want to follow the instructions, I wanted to know why I did each step and what each ingredient did to the final product. My e-library is mostly useless, but I managed to find a couple of things to read on brewing.
One of those books was True Brews, by Emma Christensen. It's phenomenal! She covers every kind of yeast brewing, from soda through kombucha and beer to wine. She even has recipes for sake!


I've tried a couple of recipes: sparkling cherry wine that I made from cherries I grew in my yard, and chai mead - which has made me realize how much I like dry mead. I always thought I disliked mead, but apparently I just dislike sweet, renfair-style mead. Dry mead is delicious!


This June, we had an amazing profusion of lilacs. Lilacs grow like crazy in my climate, so almost everyone in town has tangles all around their yard. This means that June always smells amazing. I had been doing a bunch of reading about dandelion wine and while I was in my yard, breathing the scent of my favourite flower, I thought "why can't I made something with lilacs?" I decided to try my hand at a lilac mead, using one of the recipes in True Brews as a starting place.


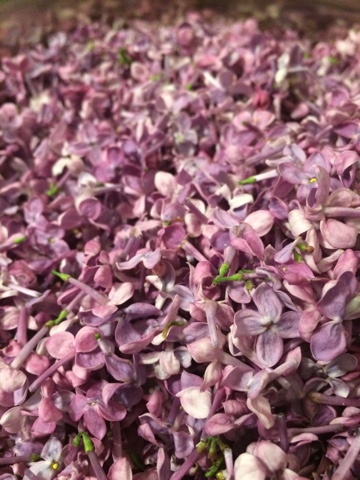
I picked a huge bucket of lilacs, then removed the blossoms from the stems. This was a long, sticky process. I also learned that you should keep the sprays in water so they don't wilt. From about 4 gallons of sprays, I eventually ended up with about 6 quarts of blossoms.


I boiled up 14 cups of water and mixed in 2.5 lbs if honey, then poured it over the blossoms. I let it sit overnight to steep. It smelled.... odd. And it was an incredible pink.


<- Honey


                     Pears ->


I'm not going to post the recipe here as it would mean my straight-up copying Emma's recipe for Blueberry-Lavender Mead with a different fruit and flower (other than the fact that I made the lilac tea first, instead of adding it with the pears). I'm not okay with doing that. Plus, if you are really into brewing, I think you should get this book. It's so very worth every penny.


I'm so high-tech


Straining the after the primary fermentation
Anyway, after the normal 4 weeks of fermentation I decided it wasn't ready to bottle (it was still fizzy and the SG wasn't where I wanted to to be) so I left it. Then I got crazy, stupid busy and never had time to get back to it. So it ended up bulk aging for another 5 months, which isn't a bad thing. When I finally got around to bottling it, the colour had changed to a much more orange-copper instead of the bubblegum pink I started with.

So pink!

Much more orange
I tried some while bottling, and it's very interesting. It starts with a punch to the face, but finishes amazing, leaving you with a very delicate floral flavour. I'm quite excited to see what it's like in another few months!

Starting Gravity: 1.093
Final Gravity: 0.998
Approximate ABV: 12%