Showing posts with label kids. Show all posts

Friday, 22 July 2016

What, Me Crafty? Again! (Glow worm caves)

This past Christmas, my husband's sister got the kids a subscription to Little Passports. If you've never heard of this, it's amazing. Once a month, the kids get a package containing a letter from the three characters traveling the world, a post card, activities, stickers and a special present all relating to a theme.
The "monuments" month came with miniatures for four famous landmarks (the Leaning Tower of Pisa, the Taj Mahal, the Great Wall, aaaaaaand..... The Statue of Liberty, I think) and the "food" month came with this really nice solid wood fishing game. This month was "natural wonders" and it came with a big chunk of pyrite (Fool's Gold) which the kids are now obsessed with. 

These aren't the worms. These are sticky strings of saliva they use to catch food. But how beautiful are they?
The point of my story is that in the activity book there is often a craft. Which we don't do because mummy isn't much of a craftypants. Usually. Today, however, was a different story. The craft was inspired by the Glowworm Caves in Waitomo, NZ, which are amazingly cool. If you haven't heard of them, watch BBC's Planet Earth. Ah-mazing. And the end result of the project was also amazing! How was that for a segue? 
I did tweak the instructions a little, mostly by adding glitter and trying to make it look more like the actual glow-worm chains in the cave. And really, no project is ever made worse by the addition of glitter! 
This isn't the glow worms, either. It's the end result of this craft! How awesome!
Materials:
Glass jar with a lid
Yarn or string
Glitter paint
Glow-in-the-dark paint (in a squeeze bottle works best)
Paint brush
Glue or tape

1. Cut the yarn into various lengths, dependent on the size of your jar. 
2. Paint the pieces of yarn with glitter paint, leaving about 1cm unpainted at one end.


3. Once the glitter paint is dry, add dots of glow-in-the-dark paint down the length, leaving about 5mm between dots. Let dry completely.


4. Glue or tape the unpainted ends of the yarn to the inside of the jar lid. I covered the inside of the lid with double-sided tape so the kids could stick their bits of yarn on without getting themselves stuck or making a huge mess.


5. Screw the lid on the jar, making sure to keep all the yarn inside.


6. Charge it up in a light and then watch them glow!

The kids are so in love with these things!

Tuesday, 22 March 2016

What, Me Crafty?

Last week, Rowan's teacher sent home a request for hard-boiled eggs. They were to be sent with him today as the class wanted to dye Easter Eggs. He was very excited about this, and naturally Willow wanted in on the excitement. To her dismay, we once again reminded her that she doesn't go to school yet. Sadness ensued.... Then I had a brilliant idea: why don't I boil extra eggs and then she and I can dye some ourselves? We could do a CRAFT! (Here's the thing. Many people consider me very crafty. I am not one of them. I make things, yes, but I've never thought of myself as crafty. There's a distinction there, it's in my head, but don't ask me to explain it coherently. Anyway, I haven't dyed or decorated eggs since elementary school, so this is kind of a big deal.)

I think I did okay, too.

I love to eat hard-boiled eggs, so decorating them always seemed an unnecessary step between the egg and my stomach. Then last year, while on a playdate, the kids got to decorate eggs and they wouldn't let me eat them. Naturally, the rules are different this year. If I'm going to be crafty, I'm going to get a snack out of it. So there.

Pretty blue!

I made up a dye bath, a very basic food colouring one: 1 cup boiling water, 1tbsp vinegar, 20+ drops food colouring. I'm very excited to know this recipe. (Apparently if you mix 1tbsp of olive oil in with the bath you can do tie-dye eggs. I haven't tried this, but now I really want to.) 

It looks like a Doctor Who prop...

My plan was for us to just plain-old dye the eggs, maybe try a two-tone dip-dye, but Willow had another idea.
Last October, the ever-wonderful Mista at AppleBox Boutique sent the kids two sample pots of Chalk Paint to paint pumpkins. I'm sad to say that that didn't happen, because I was way too busy. How busy? Let's say I lost 10 lbs. that month simply due to not having time to eat. It was a tough month. However, Willow never forgot about the "special paint" Mista had sent her, so when I started getting things set up to dye the eggs, she immediately went to the shelf and got the paint pots and her paintbrushes down. She was going to paint her egg, no arguments allowed.

Hair! 

It worked beautifully! She put the paint on pretty heavy, so we let it dry for a while and then wiped the excess off, coincidentally leaving behind a neat texture (Willow laughed and laughed, "It's an egg with hair!!!").
And now for the pink

Lots and lots of pink...

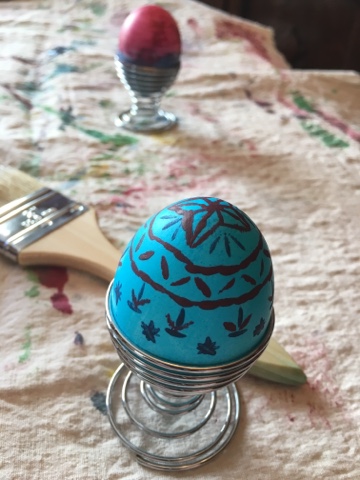
I still wanted to try the dye bath, so my egg became blue. I quite like the colour, but totally plain isn't really my style, so I added some designs with the Chalk Paint. I'm super happy with it. I would have continued the designs over the whole egg, but the bottom cracked when I was putting it (read: dropping it by accident) into the dye bath. I have faith that the food colouring will be safe to eat, but I'd rather not chance eating straight paint... Next time!

Pink and blue!


There will definitely be a next time. The kids and I are going on a road trip this weekend and hard-boiled eggs are a favourite road snack of mine. This trip, they will be Fancy!


Tuesday, 10 September 2013

Sneaky veggies (Coconut-carrot oatmeal cookies)

I have small children. This means I am forever trying to find ways that they will eat vegetables. I try not to be too sneaky, I want them to realize what they are eating when they enjoy it. Sometimes, though, I just want to be able to feed them something I know they will eat (i.e., cookies) and be happy in the knowledge that they are also eating something healthy (i.e., carrots). 


I toasted the coconut before putting it in. It makes my house smell so good and adds a nice nuttiness to the cookie.


tried to make the recipe as healthy as I could (cutting most of the sugar, swapping out most of the butter for applesauce...) but they are still cookies. 


They aren't a meal, but they're a reasonable snack. 


They would probably also be good spread in a 9" square baking pan and cut into bars, too....


Recipe: (adapted from Joy of Cooking oatmeal raisin cookies)

Preheat oven to 350, grease or line two cookie sheets.
Whisk together
2 cups flour
3/4 tsp baking soda
3/4 tsp baking powder
1/2 tsp salt
1/2 tsp ground cinnamon
1/2 tsp grated or ground nutmeg

Beat together until well-blended
1 cup applesauce and butter (about 1-2 tblsp butter, the rest applesauce)
1/2 cup packed brown sugar
2 large eggs
2 1/2 tsp vanilla

Add flour mixture, stir. Mix in:
2 cups finely grated carrots
1 1/2 cups toasted unsweetened, shredded coconut
1 cup old-fashioned rolled oats
1/2 cup chopped pecans

Drop by tablespoon fulls about 2" apart on cookie sheets. Flatten to about 1/2" thickness. Bake until lightly browned, 12-14 minutes. Let stand briefly, then move to wire rack to cool completely.